This guide will show you how to use the whiteboard feature during a Zoom class session.
Whiteboard Settings
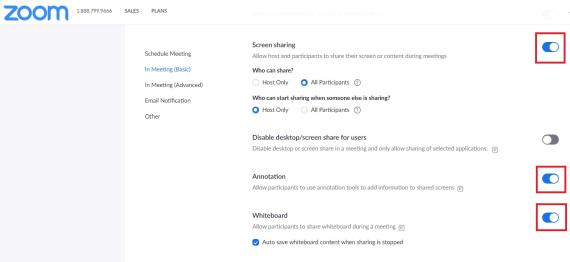
1. Navigate to www.washington.zoom.us and click on Settings in the left hand menu.
2. Ensure that Annotation and Whiteboard are enabled.
Using Whiteboard during a Zoom session
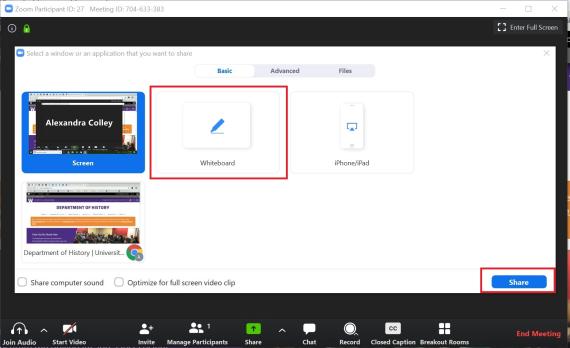
1. When you are in an active Zoom meeting, click the Share Screen button on the menu bar.
2. Click on Whiteboard, and click Share.
3. Use the page controls in the bottom-right corner of the whiteboard to create new pages and switch between pages.

4. Use the tool bar to use the annotation tools. If you click on Whiteboard, the tool bar will disappear. Bring it back by clicking on Whiteboard again.

- Select: Select, move, or resize your annotations. To select several annotations at once, click and drag your mouse to display a selection area.
- Text: Insert text.
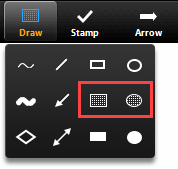
- Draw: Insert lines, arrows, and shapes. To highlight an area of the shared screen or whiteboard, select following square or circle icon to insert a semi-transparent square or circle. This can function as a highlighter tool if you change the color to yellow under Format.
- Stamp: Insert predefined icons like a check mark or star.
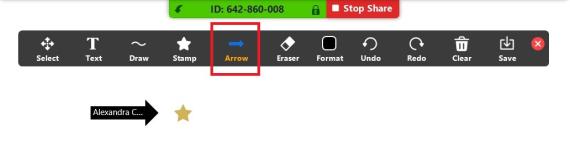
- Spotlight / Arrow: Click on the Spotlight button to see the two options for turning your cursor into a spotlight or an arrow.
- Spotlight: Displays your mouse pointer to all participants when your mouse is within the area being shared. Use this to point out parts of the screen to students, like an online laser pointer.
- Arrow: Displays a small arrow instead of your mouse pointer. Click to insert an arrow that displays your name. Each subsequent click will remove the previous arrow placed. You can use this feature to point out your annotations to students.
- Eraser: Click and drag to erase parts of your annotation.
- Format: Change the formatting options of annotations tools like color, line width, and font.
- Clear: Delete all annotations. You can choose to delete your annotations or students' annotations. In order to delete only one annotation, select it and hit delete on your keyboard or use the eraser tool.
- Save: Save all annotations on the screen as a screenshot. The screenshot is saved to the local recording location.
5. When you are done, click Stop Share.