This guide will show you how to use Zoom for live discussion sessions with your class. Zoom and Canvas are now integrated so that you can easily schedule sessions from your Canvas course page, and they are automatically published for students to find. We recommend also configuring your settings in the Zoom web portal so that you can protect your classes against malicious "zoom bombing" and utilize tools such as chat, breakout rooms, whiteboard, and polls.
Zoom Tutorial Outline:
Scheduling your recurring class sessions in Canvas
Scheduling your recurring class sessions in Canvas
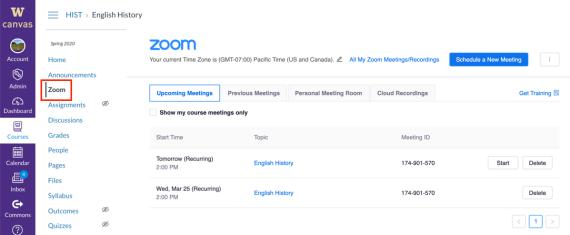
- Navigate to your course in Canvas and click on the Zoom button in the far left menu.
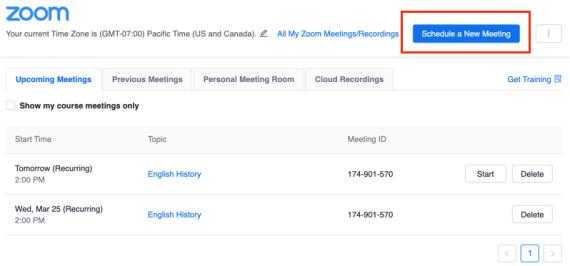
- Click the blue Schedule New Meeting button in the top right.
-
Enter a meeting topic and description. By default, the meeting topic is the title of your course.
-
Enter date and time and duration. To schedule all your class sessions for the quarter, select the Recurring meeting checkbox.

5. Configure your meeting settings:
- Registration: This requires attendees to register with their name and email to enter the class. We do not recommend using this unless you are concerned about security.
- Audio: Choose whether to allow users to call in via Telephone only, Computer Audio only, or Both. We recommend selecting Both to give students options.
- Enable Join Before Host: We recommend selecting this option.
- Mute participants on entry: By selecting this option, participants will be muted when they first join. Participants can un-mute themselves after joining the meeting. We recommend selecting this option to reduce background noise.
- Record the meeting automatically: We recommend recording to the cloud if you want the recording to be freely available to students in Canvas, so that those who cannot join synchronous class sessions can still benefit. If you do not select this option now, you still have the option to start, pause, and stop a recording at any time during a session. See Record class session in this guide for more information and to ensure your recording settings are set up properly to protect student privacy.
- Alternative hosts: Alternative hosts can start the meeting in your place, manage activity in Chat, and lower Raised Hands after questions have been answered. The UW NetIDs of your co-instructors or Teaching Assistants should automatically appear in this field.
6. Click Save. The meeting will appear on your Canvas course calendar and the upcoming meetings tab, making it easy for students to find the link and join each class session.
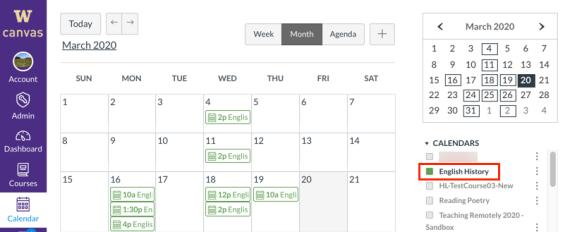
Course calendar
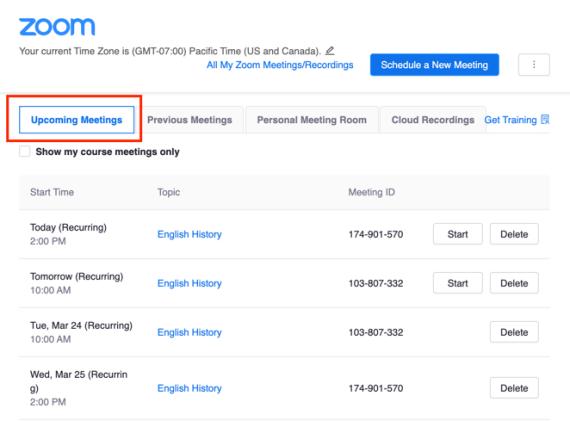
Upcoming Meetings
Running a Zoom class
- Navigate to the Canvas course page. Select the Upcoming Meetings tab. Find your meeting and click Start. Your Zoom meeting will open.
- Take a moment at the beginning of the quarter or the beginning of each session to go over "netiquette". Some items to consider: ask students to introduce themselves and share their preferred pronouns; clarify your expectations for respectful and open-minded discussions; ask students to use the raise hand feature to avoid interruptions.
- Select Gallery View in the top right of the Zoom meeting screen. This way, you will be able to see all the students in the class at once. Most screens max out at 25 students; classes larger than 25 students would have two pages that you can toggle between.
- Request that students mute their microphones when they are not speaking to cut down on background noise. You can also mute students manually by selecting Manage Participants in the menu. You can mute individuals in the participant list or select Mute All at the bottom of the participant list. Students can always un-mute themselves using the microphone icon on the left side of the menu.
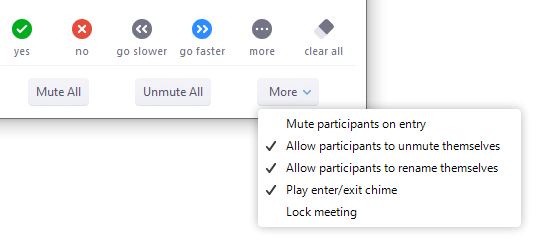
5. You may want to ask students to submit their questions via chat or use the raise hand button so that you have an idea of who to call on during discussions. When students click the raise hand button you will see a notification pop up from the menu bar, a blue hand icon on their screen, and a blue hand icon next to their name in the Manage Participants window. Students will need to manually click the lower hand button once you've called on them. Remember that students joining the session on audio only cannot use the raise hand or chat functions.
Manage Zoom meeting settings
If you have time, it is helpful to check over the advanced meeting settings on your Zoom profile (not on the Canvas Zoom app) before scheduling meetings to make sure you will be able to access all the functionality you need to successfully run a class discussion and to protect your students' security.
- Navigate to https://washington.zoom.us in a web browser. Sign into Standard UW Zoom with your UW NetID. If it isn't working, try clearing the cookies and cache or using a different browser.
- In the left sidebar click on Settings. Review the following:
- Join before host: We strongly suggest, for privacy concerns, that you disable join before host.
- Only authenticated users can join meetings: Be sure this is selected so that attendees have to be signed into a UW NetID to access the session. This prevents "zoom bombing."
- Chat: Select this to allow for the in-meeting chat function.
- Private chat: Consider un-selecting this so that students cannot send each other private chat messages during class.
- Polling: You must select this if you want to be able to create polls for your class session. Learn more about using polls in our mini-guide.
- Whiteboard: You must select this if you want to be able to use the whiteboard notes sharing feature. You also have the option here to auto-save whiteboards when sharing is stopped. Learn more about using whiteboards in our mini-guide.
- Breakout room: You must select this if you want to use breakout rooms during a meeting. Also check the box that says "Allow host to assign participants to breakout rooms when scheduling". Learn more about managing breakout rooms in our mini-guide.

- Captioning: Consider allowing closed captioning and allowing participants to save the captions. This could be a useful accessibility tool for your students.

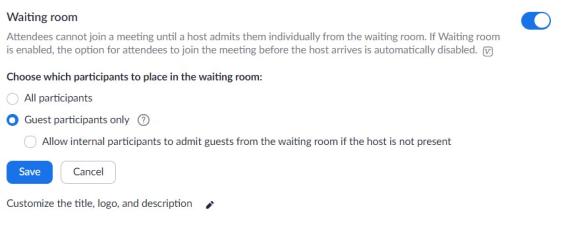
- Waiting Room: Enable the waiting room for all participants or guest participants only (anyone not signed into a UW Netid) to prevent "zoom bombing." This means you, as the host, will need to individually admit each participant into the meeting. If someone you do not recognize tries crashing your session half way through, you will be able to block them before anything bad happens.