This is a simple guide to using breakout rooms in a Zoom class session to facilitate small group discussions.
Outline:
Creating and pre-assigning breakout rooms
Initiating breakout rooms during a Zoom session
Using breakout rooms effectively
Creating and pre-assigning breakout rooms
The simplest way to do breakout rooms is to assign students randomly during a class session. However, if you want students to be pre-assigned to breakout rooms (perhaps based on group project assignments), you can do so before class begins.
- Sign into the Zoom web portal at www.washington.zoom.us.
- Navigate to Settings on the menu on the left and scroll down to In Meeting (Advanced) to enable breakout rooms and enable assigning participants to breakout rooms when scheduling a meeting.

3. Click on Meetings as the lefthand side. If you have already created the meeting in Canvas, then you will need to find it in your meeting list, hover over it, and click the Edit button. Alternately, if you have not yet created a meeting, then you can click Schedule a Meeting at the top right.
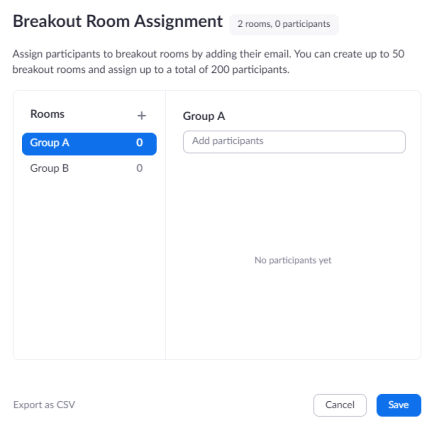
4. In the meeting options, select Breakout Room Pre-assign and click on Create Rooms.

5. Click the plus icon beside Rooms to add breakout rooms. Type students' emails into the Add Participants box. Hover over the default breakout room name and click the pencil icon to rename it or click the trash icon to delete it. Hover over a participant's name to see options to move them to another room or remove them from the current room. Click Save when you are done.
Note: If you have set up a recurring Zoom meeting for your class, Zoom will remember the randomly assigned breakout room groups and keep them the same from session to session.
Initiating breakout rooms during a Zoom session
1. While you are in a Zoom session, click on the Breakout Rooms icon in the menu bar. A pop up window will appear.
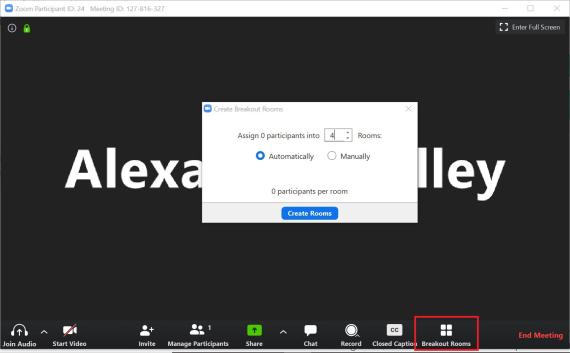
2. Check your settings. Assigning students automatically will randomly divide them between the number of rooms you specified. Assigning students manually will require you to assign each student to a room. Click Create Rooms to move on to the next step in creating the breakout rooms.
3. Verify that students are assigned to appropriate rooms. If you've pre-assigned breakout rooms, click Revert to pre-assigned rooms to ensure students are in the breakout rooms you specified when you scheduled the meeting.
4. Click on Options to manage the settings. Here you can allow students to return to the main session at any time (we strongly suggest selecting this option), automatically close rooms after a set amount of time, notify you when the time is up and students return to the main room, and include a countdown that shows students how much longer they have in their breakout rooms. Adding a timer to the breakout session is personal preference; you'll always be able to manually end the breakout session by clicking Close all rooms at any time.
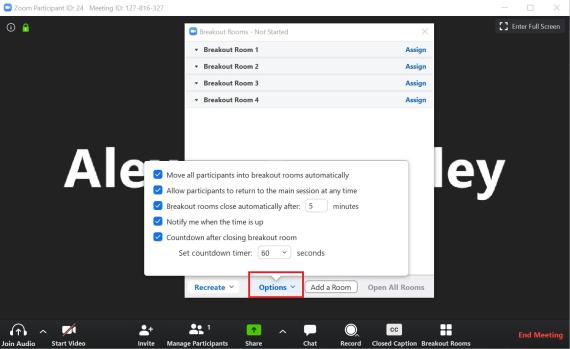
5. Click Open All Rooms when you are ready to start the breakout session. Once you've confirmed, the students will be automatically prompted to join their breakout room.
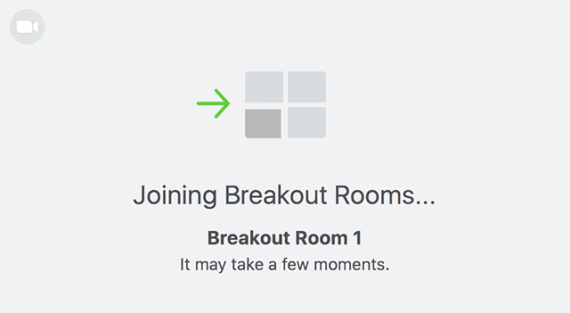
6. The students (and the host when manually joining a room) will see the following message shown when joining the breakout room.
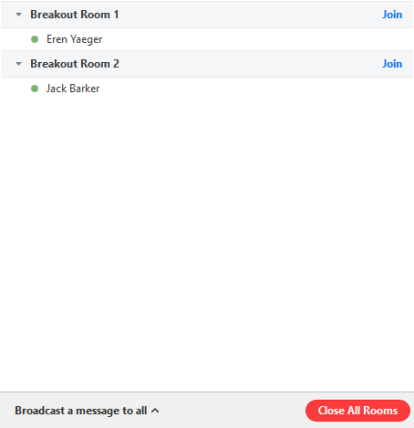
7. Now that the breakout rooms are in progress you will see the below window. If a student has not joined the breakout session yet, it will be noted by "(not joined)" next to their name. You can click Join next to breakout room to enter it and participate in the conversation. You can also send a message to all by clicking Broadcast a message to all if you wanted to add another discussion prompt or give a five minute warning.
8. Click Close All Rooms to end the breakout session (or allow the rooms to time out if you specified a time limit). Once the rooms are closed, Zoom provides one minute for students to leave breakout rooms and come back to the main room.
Using breakout rooms effectively
- Put students in small groups (3-4). Ask them to introduce themselves to each other when they arrive in their breakout rooms.
- Remind students that expectations for professionalism and good netiquette apply in the breakout rooms as well. Students should always be allowed to return to the main room or request that the instructor (the meeting host) join their breakout room if needed. Zoom provides a button for students to do this easily.
- Prime students to go from passive to active mode. Give students very clear directions about their objective in the small breakout groups and what will be expected of them when the breakout session is over. Consider doing a class-wide poll before the breakout session to prime them for active mode.
- Students will no longer have access to anything in the main room once the breakout session has begun (including the chat and the whiteboard). Consider posting the discussion objectives/prompts on Canvas and ensuring each student has Canvas up in another window before the breakout session begins.
- Ask that students report back to the entire class once the breakout session is complete. Consider having them produce a specific deliverable rather than just a summary of what they discussed.
- Consider your asynchronous students. Zoom does not record anything in breakout rooms. Clarify how your asynchronous students can complete a version of the breakout room activity on their own, if applicable.