This is a guide to conducting a poll during a live zoom session. This is a helpful tool for keeping students engaged and having regular check-ins to make sure they're absorbing information. Before you're able to use polls in Zoom you'll need to check your meeting settings.
Setting up polls
1. Go to https://washington.zoom.us and click on "Meetings" in the menu on the left side of the screen.
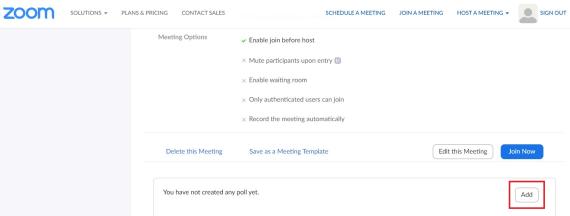
2. Navigate to the meeting you've created for your class and scroll all the way to the bottom of the meeting management page to find the poll option. Click "Add" to begin creating the poll.
3. Enter a title and your first question. The title is there to help you identify the poll you want to use during the session. Decide whether you want students to select one answer (single choice) or multiple answers (multiple choice). You also have the ability to make the poll anonymous.
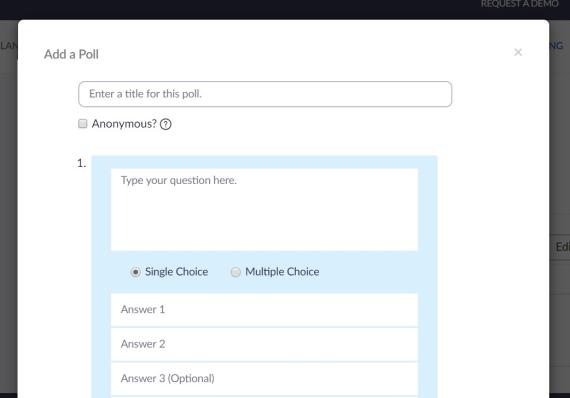
4. If you would like to add a question to this poll, so that students are prompted to answer both questions at the same time, select "Add Question."
5. Click "Save" at the bottom of the screen when you are finished. Repeat these steps to add more polls (note that one meeting can have a maximum of 25 polls).
6. You can also create a poll by clicking "Polling" during a meeting. This will open up your default web browser where you can add additional polls or questions. This may be useful if you want your questions to reflect the discussion that the students are having in real time.
Launching a poll
1. Select the "Polling" option in the menu bar during a Zoom session.
2. Select the poll you'd like to launch and click "Launch Poll."
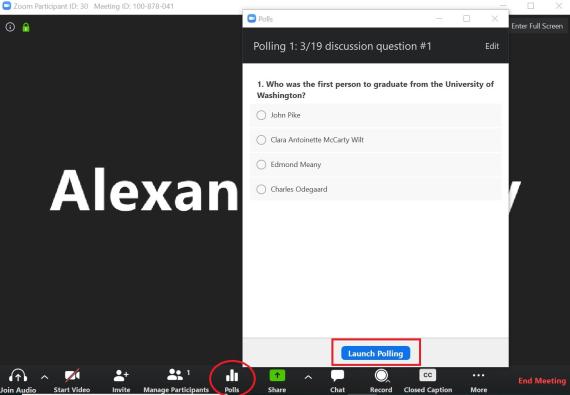
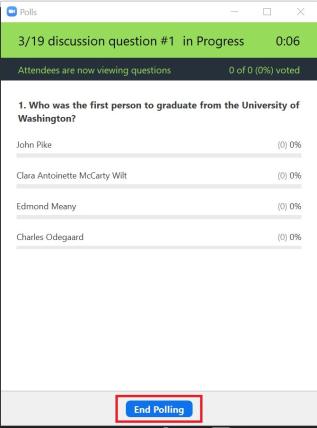
3. The participants will now be prompted to answer the poll (you do not need to share your screen). You can watch the results live. If students are not seeing the poll, they need to allow pop-ups in their application settings. Once you are satisfied with the number of responses, click "End Polling."
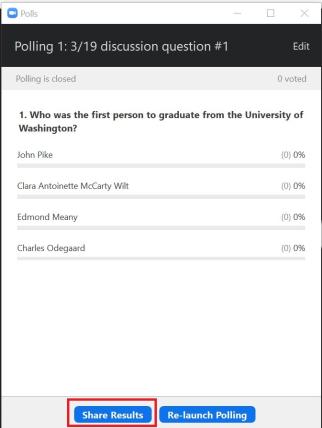
4. Click "Share Results" so that students can see the results of the poll, if desired.
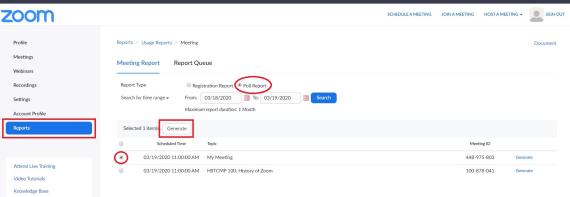
5. You can download a report of the poll results after the meeting. Navigate to the "Reports" tab in the menu on the left side of the screen. Select "Poll Report" and the appropriate meeting. Click "Generate" to create the report. Note: If registration was turned on and the poll was not anonymous, it will list the participants' names and email addresses. If registration was not on, it will show the results, but list the users as "Guest". If the poll was anonymous, it will show "anonymous" for the participants' names and email addresses.